¶ Preparation
¶ USB
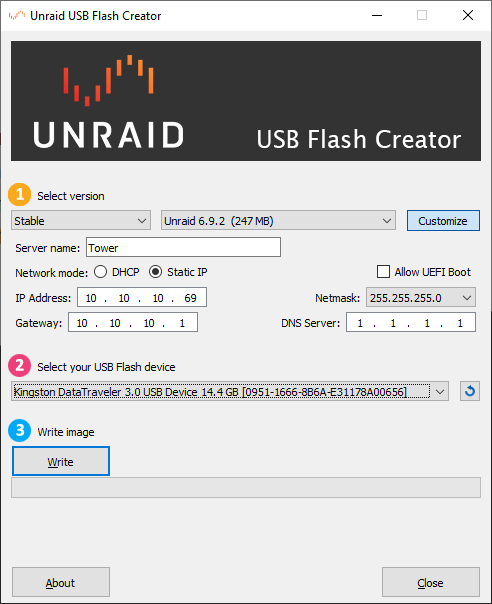
Firstly get the most up to date version of the flash creation tool and choose a high quality USB device to install on to. A USB 2.0 is recommended as the speed is not relevant and they seem to bw more reliable than 3.0. I used a cisco branded USB, mostly as it has a flashing blue light when in use, which indicates when the server is writing to it. This doesn't happen often as unraid is loaded in to RAM on startup.
Choose the latest version and select the USB drive then start writing.
¶ Bios
The bios has to be changed to boot from USB before anything else. Particularly if you plan to directly pass an SSD through to a VM as this could be booted from before the USB.
In order to create that VM in the first place virtualisation has to be enabled in the BIOS too.
It is a good idea at this point to turn on Wake-on-LAN if the motherboard supports it
Save these settings and reboot.
At this point the server can be accessed remotely by putting either http://tower.local or the servers IP address in to a browser.
Replace tower with the servers name if you modified it during USB creation.
¶ License
Select use trial key. A full license can be purchased through the unraid gui at a later point. This will give you 30 days however this can be increased to 60 by requesting an extension during this time.
¶ Storage
¶ Set up the array
The Array is where the main storage for unraid is. I barely make use of this.
An array pool can contain up to 30 drives, 28 storage and 2 parity. If using the unraid server as a NAS this gives a good number of benefits.
- Having only one or two drives as parity means you get a much higher percent of your storage to use as actual storage compared to raid.
- As long as the parity drive matches or exceeds the size of the largest storage drive then the rest of them do not have to match.
- Files are not stripped across drives like raid so if a drive fails and you do not have a parity drive the other drives will be unaffected.
I have two 1TB drives, one for storage and one for parity. Which is currently no better than a simple main and backup but can scale easily.
¶ Add a cache drive
Adding an SSD as a cache drive will speed up writes for the array, as well as reads for shares stored only on cache. Depending on how you plan to use a share it will sometimes be best to store it only on cache and other you should use the array.
I have one 1TB SSD as my cache drive.
¶ Auto Start/Spin Down
Changes to the array settings can be made under Settings > Disk Settings.
The first thing to do here is turn set Auto start to Yes. This will mean that when you first turn on or you reboot your unraid machine the array will initialise straight away and by extension any docker containers or VMs set to autostart will be able to do so.
Also on this page you can set a spin down delay for hard drives in your array. This setting will mean that any drives not in use will be effectivly turned off until they need to be accessed.
¶ Settings
It is a good idea to add a password to root before doing anything further. Do this via the users tab at the top of the page.
¶ Shares
Shares are the main method of storing data on unraid. By default this will contain appdata, domains, isos, and system. the important column here is cache as it will tell you how each share is stored.
Each share also has export and security settings which determin if it is able to be remotely accessed and how easily/securely.
You appdata share will be where you store all the persistent data for docker containers. This means storage and settings for all 'apps' in order for it to remain when teh container is restarted.
It is advised to set this share to cache only or cache prefer in order to speed up load times with containers. Although regular backups are a must as this means there is no parity protection.
Domains is the share that instances of virtual machines are stored in, it is like the appdata for VMs.
It is advised to set this share to cache only or cache prefer in order to speed up load times with containers. Although regular backups are a must as this means there is no parity protection.
The isos share is for storing .iso files etc that will be used for installing new VMs.
Isos has no need for the speed of the cache and therefore would benifit more from the parity protection provided by the array.
The system share is for storing your docker.img and libvirt.img.
It is advised to set this share to cache only or cache prefer in order to speed up load times with containers. Although regular backups are a must as this means there is no parity protection.
¶ Flash settings and backup
On the MAIN page, under boot device, click Flash. This will open the Flash settings page which starts with some info on your USB drive and a FLASH BACKUP button. Clicking this will create and download a zip file which can be used to restore or recreate your unraid boot drive. This can be done on a schedule with the My Servers plugin.
Next is the SMB settings for the USB. This can be useful if you need to make persistent changes such as adding perminent ssh keys but for the most part you want to have this set to Export: No to keep it secure.
Lastly you can edit the syslinux config to make changes to how unraid boots and what each of it's boot options do. However, with the latest version of unraid it is unlikely you will need to make any changes here.
¶ Activate Docker/VMs
Docker apps and VMs can be activated by going top Settings > Docker or Settings > VM Manager.
Once enbled you can then add apps and VMs under their respective tab. I don't make much use of VMs but docker containers on unraid are incredibly well managed and by far the best use of your server.
¶ Community applications (The Apps Tab)
Community applications should almost always be the first thing you do on an unraid server. Install instructions are on plugins.